WAXHISPANO
Create Games On WAX Using Unity, Part 4 — Checking If A User Holds An NFT
Create Games On WAX Using Unity, Part 4 — Checking If A User Holds An NFT
02/24/2024
Welcome to part 4 of my ultimate guide for creating Unity games on WAX Blockchain. In the previous articles, we managed to log a user in, switch to a new scene, and show them a welcome message that included their WAX wallet address.
In this article, we will cover the following topics:
- Creating a button that a user can click to scan their wallet for a certain NFT
- If they don’t have the NFT, we will direct them to a market page, where they can view listings and buy NFTs (this market page won’t be created until a future article)
- If they do have the NFT, we will display another button that says “Start Game”, which they can click to start playing the game (the game doesn’t exist yet, we will start creating it in the next article!)
Getting Started
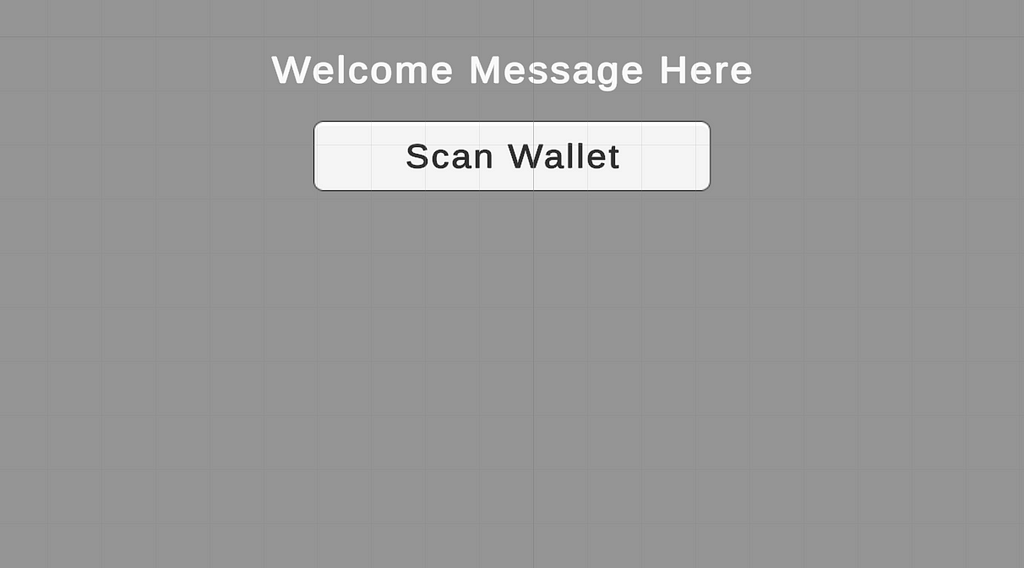
Open up your project in Unity, and make sure you have the CheckNftsScene opened in the editor. If you followed along with the previous articles, it should look like the picture above that says Welcome {Username}.
My welcome message is currently in the center of the screen, so I am going to move it up near the top and get it out of the way. I also changed the default text, just to make it more clear what it is.

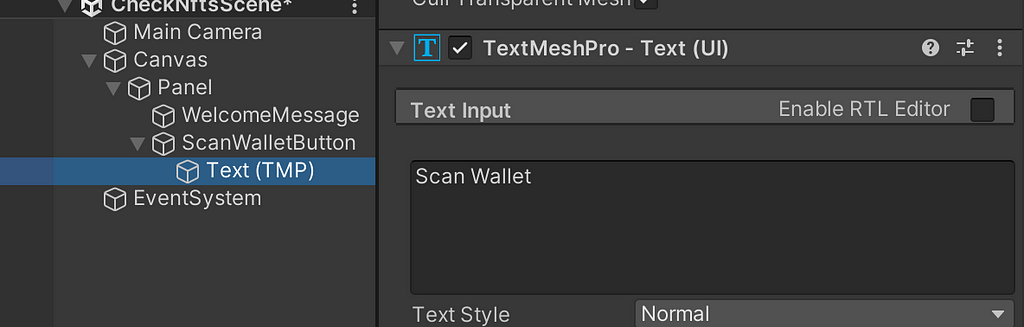
Next, let’s create a basic button that the user can click to scan their wallet. In the Hierarchy panel, right-click on Canvas > Panel, and then click UI > Button — TextMeshPro.

Once the button is created, rename it to ScanWalletButton to keep things organized once more elements are added later. Feel free to resize and style the button as you like — mine is way too small, so I’m going to make it bigger and move it up a bit. I’m also going to change the text of the button, which can be done by clicking the little arrow next to the button in the Hierarchy panel, and then select its child element (the text object).
Installing The AtomicAssets Package
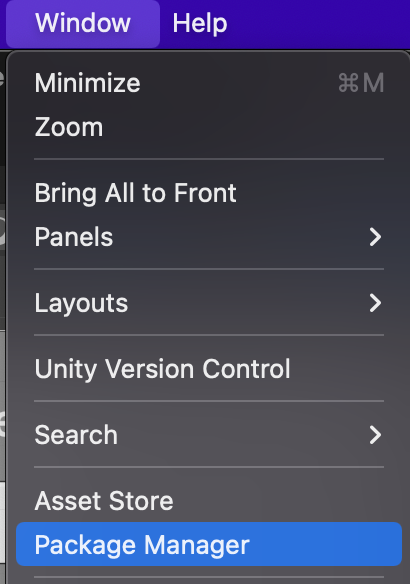
Before we can start adding logic to the button, we need to install the AtomicAssets package in Unity’s Package Manager (upm). We can do that by clicking Window > Package Manager from the toolbar in Unity.
Next, we need to click the “+” icon, and click “Add package from git URL”
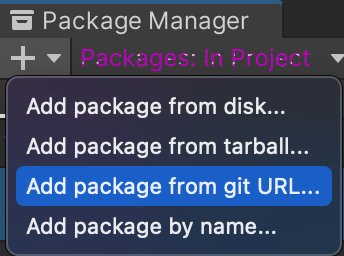
Enter the following URL into the text box:
https://github.com/liquiidio/AtomicAssetsApiClient.git#upm
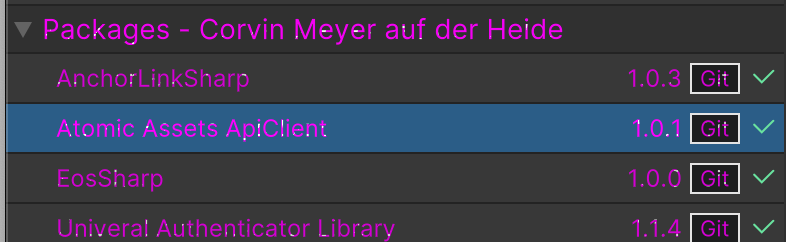
Then click the “Add” button, and wait for the package to install. If all goes well, you should now see the Atomic Assets ApiClient package in your list.
Fixing An Important Problem!
Hopefully you don’t encounter the same issue I encountered after installing the AtomicAssets package. After I installed the package, I saw the following error in my Unity console:
Asset Packages/io.liquiid.atomicassets/LICENSE has no meta file, but it's in an immutable folder. The asset will be ignored.
I’m not 100% sure whether this is an issue with the AtomicAssets package itself, or maybe it’s something related to my own computer/environment — but here’s what I did to get around this error.
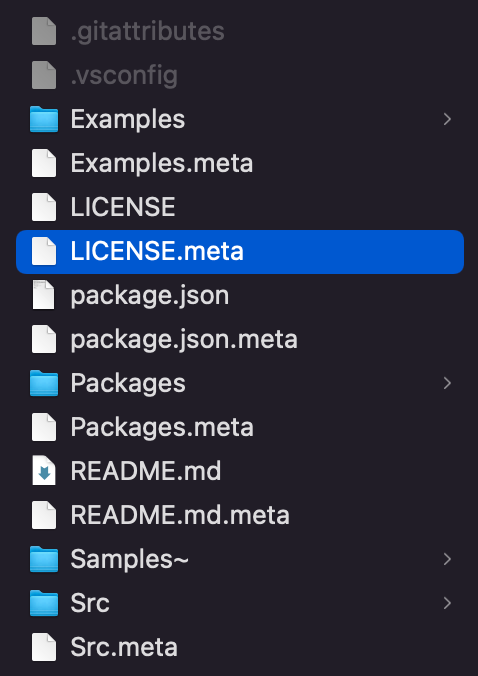
First, I opened up Finder on my Mac, if you’re using Windows or Linux then just open up whatever file explorer you have. Then, navigate to the directory where your Unity project is set up. You should see something like this inside that folder:
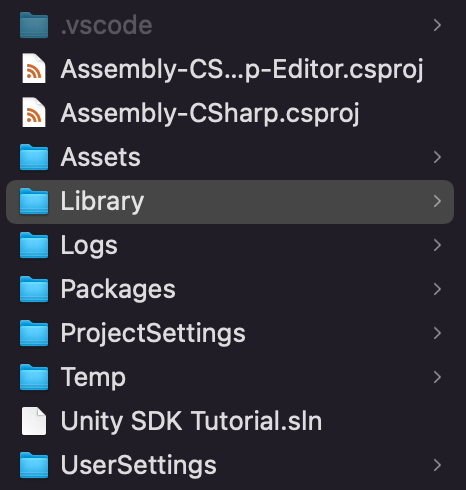
Go to Library > Package Cache > io.liquiid.atomicassets@……
Inside that folder you should see a LICENSE file. However, if you do NOT see a LICENSE.meta file to go along with it, then this is a problem. What I did, was just open one of the other folders in the Package Cache directory. Personally, I opened this folder: io.liquiid.eossharp@….
But, it doesn’t really matter which one you open. The important part is that it has a LICENSE.meta file inside of it. You can make a copy of that file, open it in a text editor, and it should look something like this:
fileFormatVersion: 2
guid: c9fafa17cb7456a4dbbcbcd49393de41
DefaultImporter:
  externalObjects: {}
  userData:
  assetBundleName:
  assetBundleVariant:
You need to make sure to use a unique guid when you do this (Unity uses this number to identify the package), so make sure you change the guid so it’s different from the original file you copied.
Once this is done, you can save this inside the AtomicAssets directory as LICENSE.meta, and you should end up with a directory that looks like this:
Creating The ScanForNfts Script
Ok, now we are ready to add a script to our button. Select the ScanWalletButton in the Hierarchy panel, click Add Component, and add a new script. Name the script ScanForNfts.
Next, right-click on the script and open it up in your text editor. Paste the following code into your script:
using UnityEngine;
using AtomicAssetsApiClient;
using System.Threading.Tasks;
using System.Collections;
using AtomicAssetsApiClient.Assets;
using System;
using System.Linq;
public class ScanForNfts : MonoBehaviour
{
public enum AssetCheckState
{
    NotStarted,
    Loading,
    CompletedNoAsset,
    CompletedWithAsset,
    FailedNoUser,
    FailedUnknown
}
public static event ActionOnAssetCheckStateUpdated;
private AssetCheckState currentState = AssetCheckState.NotStarted;
public void OnButtonClick()
    {
        if (currentState == AssetCheckState.NotStarted)
        {
            StartCoroutine(GettingFilteredAssetsList());
            UpdateState(AssetCheckState.Loading);
        }
    }
void Start()
{
    OnAssetCheckStateUpdated?.Invoke(currentState);
}
IEnumerator GettingFilteredAssetsList()
{
bool userHasAsset = false;
if (GlobalSessionManager.Instance.LoggedInUser != null)
{
var _owner = GlobalSessionManager.Instance.LoggedInUser.GetAccountName().Result;
var _collectionName = "hoodpunknfts";
var _schemaName = "stickers";
var _templateId = 239748;
var assetsApi = AtomicAssetsApiFactory.Version1.AssetsApi;
var builder = new
AssetsUriParameterBuilder()
.WithLimit(1)
.WithOwner(_owner)
.WithCollectionName(_collectionName)
.WithSchemaName(_schemaName)
.WithTemplateId(_templateId);
var task = assetsApi.Assets(builder);
UpdateState(AssetCheckState.Loading);
yield return new WaitUntil(() => task.IsCompleted);
if (task.Status == TaskStatus.RanToCompletion)
{
var assets = task.Result;
userHasAsset = assets.Data.Any();
foreach (var asset in assets.Data)
{
Debug.Log($"{_owner} holds asset {asset.AssetId}");
}
if (userHasAsset)
{
UpdateState(AssetCheckState.CompletedWithAsset);
}
else
{
UpdateState(AssetCheckState.CompletedNoAsset);
}
}
else
{
Debug.LogError("Failed to fetch assets.");
UpdateState(AssetCheckState.FailedUnknown);
}
} else {
Debug.LogError("Global user can not be found");
UpdateState(AssetCheckState.FailedNoUser);
}
}
void UpdateState(AssetCheckState newState)
{
currentState = newState;
OnAssetCheckStateUpdated?.Invoke(newState);
}
}
I know the code above might be a lot to take in, so let’s go through it step by step.
public enum AssetCheckState
{
NotStarted,
Loading,
CompletedNoAsset,
CompletedWithAsset,
FailedNoUser,
FailedUnknown
}
This allows us to keep track of the different states that our API call might be in, so we can render UI elements accordingly. For example, if the API call is NotStarted, we might provide a button that says “Scan For NFTs”.
If the API call is Loading, we might just show a “Loading” spinner. If the API call is CompletedWithAsset, it means the user meets the criteria — and we can render a “Start Game” button. I think you get the point.
private AssetCheckState currentState = AssetCheckState.NotStarted;
By default, the AssetCheckState will be NotStarted.
public void OnButtonClick()
{
if (currentState == AssetCheckState.NotStarted)
{
StartCoroutine(GettingFilteredAssetsList());
UpdateState(AssetCheckState.Loading);
}
}
This create a public function that we can attach to our button’s On Click event. In other words, this function gets called when a user clicks the button. Inside the function, we start a Coroutine, which is an asynchronous function in Unity. Our Coroutine will call the function that checks if the user has the necessary asset(s) or not. Also, the AssetCheckState will be set to Loading at this point, until the API call is finished.
Note that Unity does also support async/await instead of Coroutine — each has their own advantages/disadvantages, which to be honest — I am still learning myself. But with a basic function like this one, I think Coroutine is completely fine.
void Start()
{
OnAssetCheckStateUpdated?.Invoke(currentState);
}
The reason for this Start function is just to make sure that any other objects subscribing to this function can be notified about the initial state. (In other words, when we enter this scene — make sure the whole scene knows that the state is NotStarted).
// Adjust these to meet your requirements
var _collectionName = "hoodpunknfts";
var _schemaName = "stickers";
var _templateId = 239748;

var builder = new
    AssetsUriParameterBuilder()
    .WithLimit(1)
    .WithOwner(_owner)
    .WithCollectionName(_collectionName)
    .WithSchemaName(_schemaName)
    .WithTemplateId(_templateId);
In my particular game, I need to check if the user holds at least 1 NFT that uses template ID 239748, in the stickers schema of the hoodpunknfts collection.
As you can see, I have my query designed around that logic. The AssetsUriParameterBuilder is a query builder in the AtomicAssets package that we installed earlier. There are different arguments you can add to this query — in my case, I am using a limit of 1 (only return 1 result), checking for a specific owner (the current logged in user), and also checking the collection/schema/template.
These arguments are optional, you can see a full list of supported query arguments in the official documentation.
There is one other thing you should note about my API call — I only care if the user has at least one NFT that meets the criteria. So, let’s say you need your user to hold 3 NFTs instead. You may think, “All I need to do is change the limit to 3”.
Well, sort of — that is part of the solution. But there is another line in my function that you also need to take into consideration:
userHasAsset = assets.Data.Any();
This line says “if the API call returns Any assets, then the user meets the criteria”. This works for me because I only need them to have 1 asset. But, if for example you needed the user to hold 3 assets, you would have to do 2 things:
- Change the limit in the query builder to at least 3
- Change the assets.Data.Any() line to check if assets.Data has at least 3 items in it
Moving On
Before we worry about having other parts of our game subscribe to this event (a.k.a. have our game react to the results of this API call), let’s at least run a test and see if this works.
Before we can do that, we still need to attach the OnButtonClick function to our button’s On Click handler. So save this script and go back to the Unity editor.
With the ScanWalletButton selected, you should see a box in the Inspector panel that says On Click.
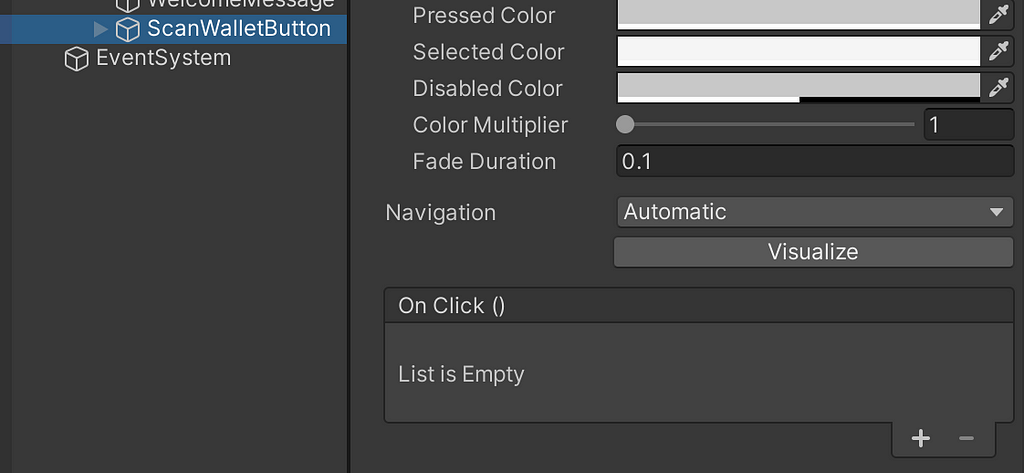
Click on the “+” icon to add a new event. Then, drag your ScanWalletButton directly onto the box that says None (Object...). It should look like this when you are done:
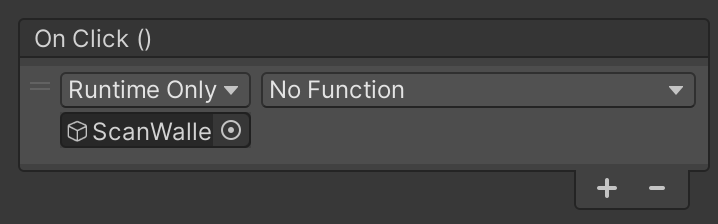
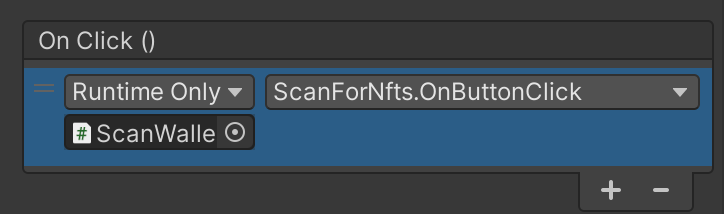
Finally, click the Dropdown menu that says “No Function”. Find ScanForNfts > OnButtonClick, and select it. When you are finished, it should look like this:
Now, we are officially ready to test our button (and the API call attached to it).
Due to the following line in our code:
foreach (var asset in assets.Data)
{
    Debug.Log($"{_owner} holds asset {asset.AssetId}");
}
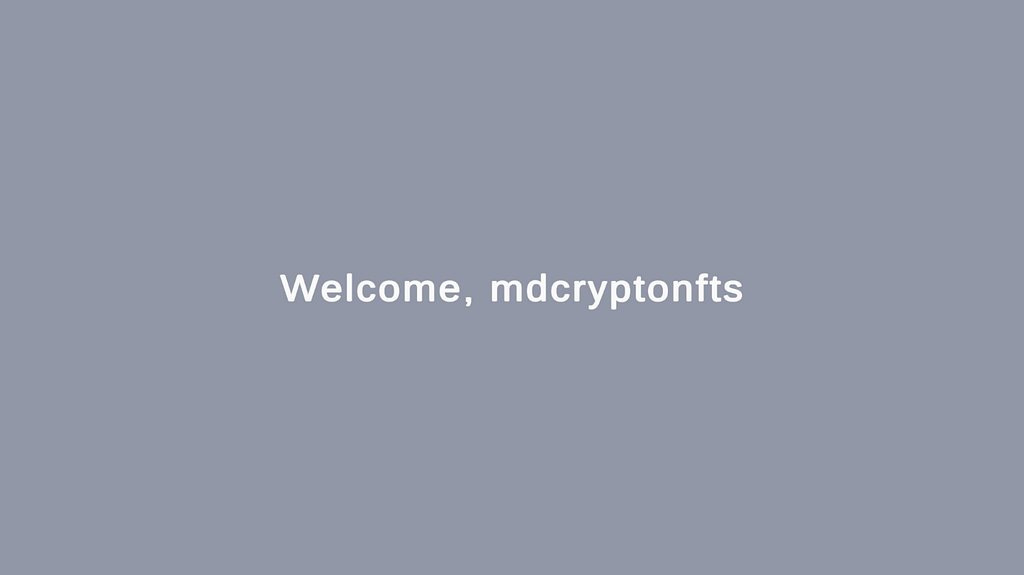
If I hold at least 1 asset that meets the criteria (which I do), then I should see mdcryptonfts holds asset
Amazing! I didn’t bother showing the asset details in the video, but if you want to go double check — take a look at asset ID 1099921888486 on waxdao.io for yourself, and make sure it matches the criteria we defined.
Subscribing To The Event
Now that we have our logic set up to notify our game about the state of the API call, we need to create a script to subscribe (listen) to that notification.
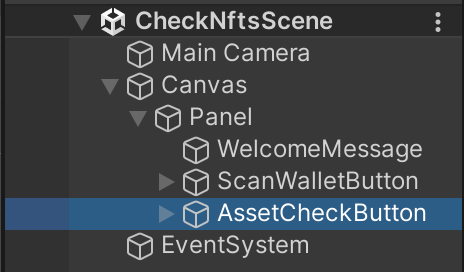
First, let’s create a new Button — TextMeshPro object in our Panel, and name it AssetCheckButton. Your scene should look like this now:
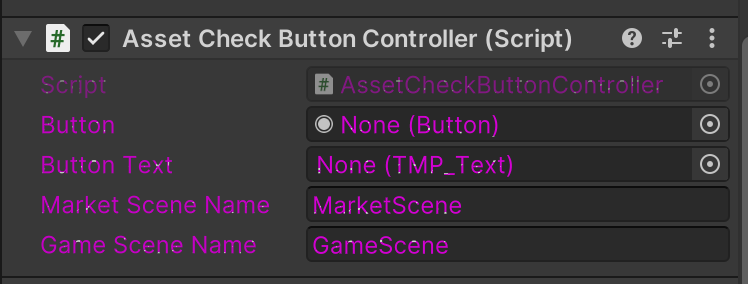
Next, click Add Component > New Script on your AssetCheckButton, and name the script AssetCheckButtonController. Open that script up in Visual Studio Code, and paste the following code into it:
using UnityEngine;
using UnityEngine.UI;
using TMPro;

public class AssetCheckButtonController : MonoBehaviour
{
    public Button button;
    public TMP_Text buttonText;
    public string marketSceneName = "MarketScene";
    public string gameSceneName = "GameScene";

    void OnEnable()
    {
        ScanForNfts.OnAssetCheckStateUpdated += UpdateButtonBasedOnState;
        button.onClick.AddListener(OnButtonClick);
        UpdateButtonBasedOnState(ScanForNfts.AssetCheckState.NotStarted);
    }

    void OnDisable()
    {
        ScanForNfts.OnAssetCheckStateUpdated -= UpdateButtonBasedOnState;
        button.onClick.RemoveListener(OnButtonClick);
    }

    void UpdateButtonBasedOnState(ScanForNfts.AssetCheckState state)
    {
        Color buttonColor = button.image.color;

        switch (state)
        {
            case ScanForNfts.AssetCheckState.NotStarted:
                buttonText.text = "";
                button.interactable = false;
                buttonColor.a = 0;
                button.image.color = buttonColor;
                break;
            case ScanForNfts.AssetCheckState.Loading:
                buttonText.text = "Loading...";
                button.interactable = false;
                buttonColor.a = 0.5f;
                button.image.color = buttonColor;
                break;
            case ScanForNfts.AssetCheckState.CompletedNoAsset:
                buttonText.text = "Go To Market";
                button.interactable = true;
                buttonColor.a = 1;
                button.image.color = buttonColor;
                break;
            case ScanForNfts.AssetCheckState.CompletedWithAsset:
                buttonText.text = "Start Game";
                button.interactable = true;
                buttonColor.a = 1;
                button.image.color = buttonColor;
                break;
            case ScanForNfts.AssetCheckState.FailedNoUser:
                buttonText.text = "Failed, Not Logged In";
                button.interactable = false;
                buttonColor.a = 1;
                button.image.color = buttonColor;
                break;
            case ScanForNfts.AssetCheckState.FailedUnknown:
                buttonText.text = "Failed, Bad API Call";
                button.interactable = false;
                buttonColor.a = 1;
                button.image.color = buttonColor;
                break;
        }
    }

    void OnButtonClick()
    {
        if (buttonText.text == "Go To Market")
        {
            GlobalSceneManager.Instance.SwitchScene("MarketScene");
        }
        else if (buttonText.text == "Start Game")
        {
            GlobalSceneManager.Instance.SwitchScene("GameScene");
        }
    }
}
Let’s break down this script a bit.
public string marketSceneName = "MarketScene";
public string gameSceneName = "GameScene";
When the button is clicked, we want to either direct a user to the MarketScene so they can buy NFTs, or the GameScene so they can play the game. We have not created either of these scenes yet, we will start creating the game scene in the next article.
void OnEnable()
    {
        ScanForNfts.OnAssetCheckStateUpdated += UpdateButtonBasedOnState;
        button.onClick.AddListener(OnButtonClick);
        UpdateButtonBasedOnState(ScanForNfts.AssetCheckState.NotStarted);
    }
By default, we will update the button based on the AssetCheckState being NotStarted. Also, we will listen to our button’s On Click events, without needing to manually define them in the Inspector panel.
case ScanForNfts.AssetCheckState.NotStarted:
    buttonText.text = "";
    button.interactable = false;
    buttonColor.a = 0;
    button.image.color = buttonColor;
    break;
Each one of these case statements will apply certain properties to our button. For example, if NotStarted, then the button will have no text, it will not be interactable, the alpha channel will be set to 0 (so it’s invisible), and the color of the button will be updated to apply that change to the alpha channel.
void OnButtonClick()
    {
        if (buttonText.text == "Go To Market")
        {
            GlobalSceneManager.Instance.SwitchScene("MarketScene");
        }
        else if (buttonText.text == "Start Game")
        {
            GlobalSceneManager.Instance.SwitchScene("GameScene");
        }
    }
If the API call resulted in an outcome where something should happen when the user clicks the button, then we will apply the On Click logic here.
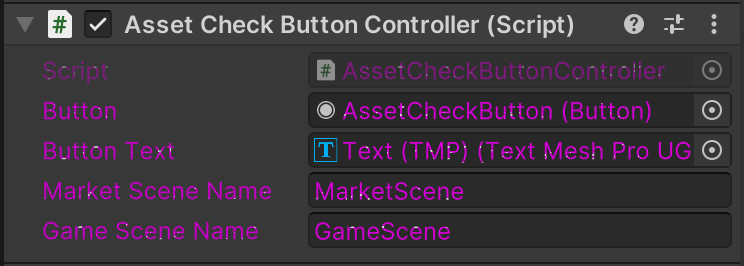
Assigning The Button Object And Text Object
We are almost ready to test out our new script, but first we need to assign the Button and Text objects to it. In the Inspector panel, you should see 2 fields — Button and Button Text.
What you need to do now is assign the proper objects to these fields. Drag the AssetCheckButton from the Hierarchy panel, directly onto the Button field. Then, drag the Text (TMP) object (child of the AssetCheckButton) onto the Button Text field. Your end result should look like this:
Now, we are finally ready to take this for a spin…
https://medium.com/media/3f9d462b6c9ba619dc79790e9edd5c40/hrefWe did it! Of course, clicking on the “Start Game” button results in an error because we have not actually created the GameScene yet, but as you can see from the console:
Scene 'GameScene' couldn't be loaded because it has not been added to the build settings or the AssetBundle has not been loaded
The button is doing exactly what it’s supposed to do. I can’t wait for the next article, because that’s when we still start building the actual game! If you have any questions or just want to follow along, feel free to join my Telegram or Discord, and subscribe to the channel in the video above.
Thank you for reading! See you in the next article.
Create Games On WAX Using Unity, Part 4 — Checking If A User Holds An NFT was originally published in waxdao on Medium, where people are continuing the conversation by highlighting and responding to this story.