WAXHISPANO
Create A Video Game On WAX Blockchain Using Unity SDK — Your Ultimate Starter Guide, Part 1

Create A Video Game On WAX Blockchain Using Unity SDK — Your Ultimate Starter Guide, Part 1
Hello, and welcome to my starter guide for creating blockchain-based video games on WAX.
This is part one of an in-depth, step by step tutorial. It won’t be a quick read, so be prepared to spend some time learning here. Also, there will be a video series coming out soon to go along with these articles. All videos will be posted on my YouTube channel when they are finished.
Before We Begin
I’d like to mention a couple of important pieces of info before we start.
- I am not a professional game developer. I write smart contracts on WAX, and I just started learning Unity recently so I could make this tutorial for you. This guide is meant to teach you how to interact with the WAX blockchain in your game — NOT how to create amazing graphics, and NOT how to design proper game mechanics/lore/etc. Your game concept is something you need to figure out on your own.
- I went out of my way to intentionally find ways to demonstrate each part of the Unity SDK in this tutorial. For example, I am going to show you how to let a user submit their “high score” to the blockchain by signing a transaction. In real life, this makes ZERO SENSE because you wouldn’t just want to trust a user to tell the truth. They could just lie and say they got 80 bazillion points. But, it was a good excuse to show you how to have a user sign a transaction at the end of a game, so I chose to do it.
- I am not the developer of the Unity SDK. It was created by Liquid Studios, a block producer/guild on WAX Blockchain. I am not the best person to ask about the SDK itself, but if you have any questions about the tutorial, or just want to chat about WAX etc, feel free to join my Telegram or Discord and ask for Mike D. Also, the documentation for the Unity SDK is on Gitbook, so feel free to reference it whenever you find yourself a bit confused.
What Are We Building?
Throughout this guide, you will follow along with me as I build a stupid, useless game — but it will feel pretty rewarding once it’s done. We will cover:
- Having a user log in to their WAX wallet using Anchor Wallet and MyCloudWallet.
- Allowing a user to log out of their session.
- Using the AtomicAssets API to find out if a user holds a specific NFT in their wallet, and only letting them play the game if they hold that NFT.
- Creating a settings panel that allows a user to choose their preferred API endpoints (if they don’t choose, we will just use the default APIs).
- Using the AtomicMarket API to allow a user to browse the NFT market for assets that they can use in the game.
- Allowing the user to buy an NFT from within the game.
- Using the Hyperion API to fetch and display a user’s token balances.
- Allowing the user to transfer tokens to other WAX wallets.
- Submitting transactions that store data in a smart-contract table on WAX (including a brief example of writing some smart contract code).
- Fetching data from smart contract tables, and showing that data to the user.
But What Does The Game Actually Do?
This game will be a simple concept, based on the old “Breakout” / “Alleyway” games. Except in this game, the bricks won’t break or disappear after you hit them.
There will be a paddle that hits a ball. That ball will bounce against some bricks and increase a user’s score each time it hits a brick.
As the score goes up, a pixel will be added to the center of the screen for each point the user scores.
Once there are enough pixels (points) to make up the full logo that I’ve chosen, the user wins the game.
If the ball goes past the paddle, the user loses the game, and can click a “Start Over” button.
Prerequisites
Before you can actually start building, there are a few things you will need.
- Obviously, Unity. You can download Unity Hub at https://unity.com/download (Fair warning — this download took me several hours, but it may have just been my crappy internet speed)
- A Unity account. At some point during the download/installation process (I forget exactly when), you will be prompted to set up a Unity account.
- Install Unity Editor. Unity will ask you to do this when you sign into the app. Note: Under “Installs” in the Unity app, click the gear icon and make sure the “Visual Studio Code” module is enabled. This is the app we will be using to write our code.
- Unity License. Requires 10 million dollars. Just kidding, you can get a free personal license right inside the Unity app. There is a paid (expensive) version, but we don’t need that for what we’re building today.
LFG (Starting Our Project)
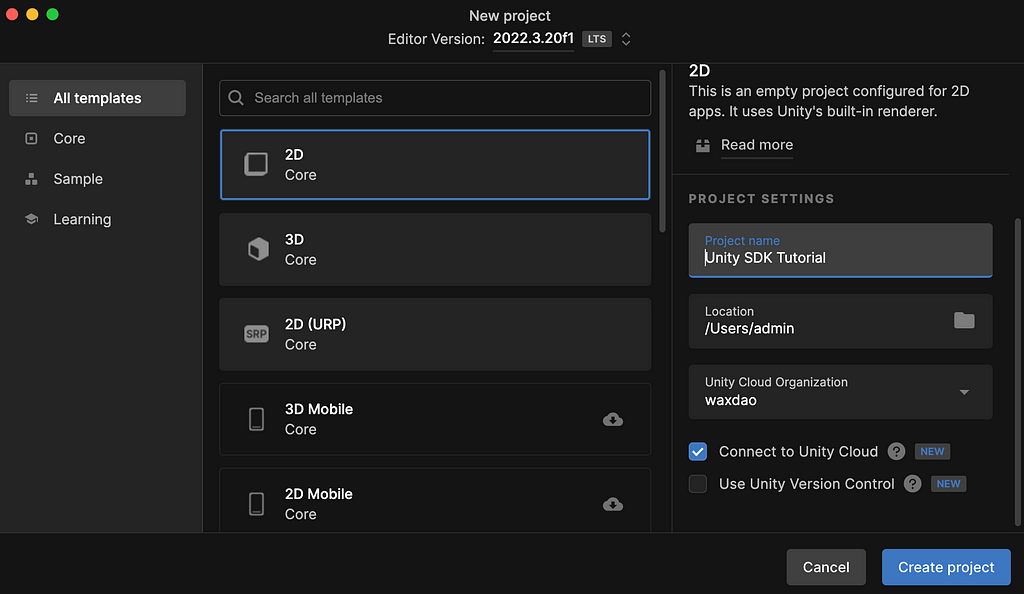
Once your Unity installation is complete, it’s time to create a new project. This can be done inside of the Unity Hub app, by clicking “New Project”.
For my project, I chose “2D Core” as the template, since this game does not require any advanced graphics. I highly recommend that you also choose 2D Core so you can follow along with this tutorial and not have to account for being in a completely different environment.
Make sure to give your project a name. I am going to name mine “Unity SDK Tutorial”. Then, click the “Create Project” button.
Game Flow: Scene 1
Now that we’ve got our Unity project open, we need to understand the flow of events and how we plan to handle each possible outcome.
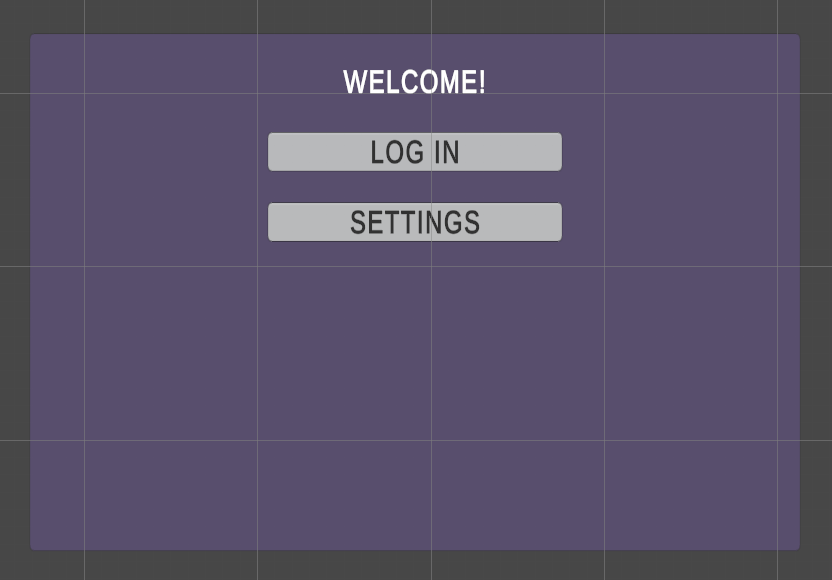
In my particular game, the very first thing that I want to happen is to show a welcome screen to the user. If they are not logged in yet, I want to display a “Welcome!” message to them — along with 2 buttons: “Log In”, and “Settings”.
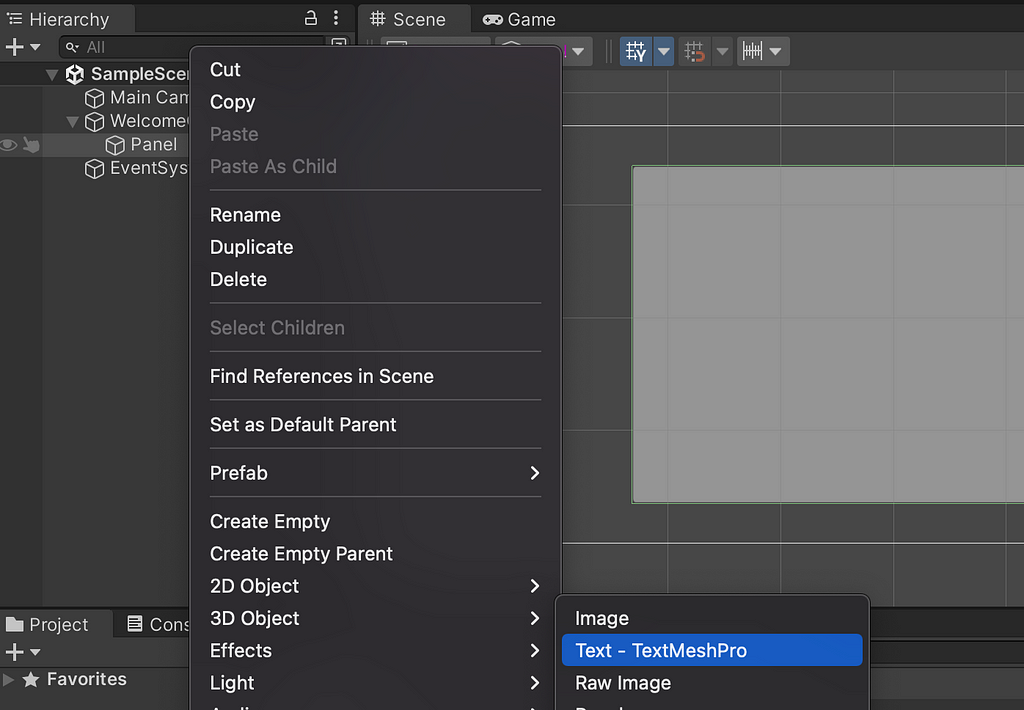
In order to do this, we have to right click inside the “Hierarchy” panel, and click “UI > Canvas”.
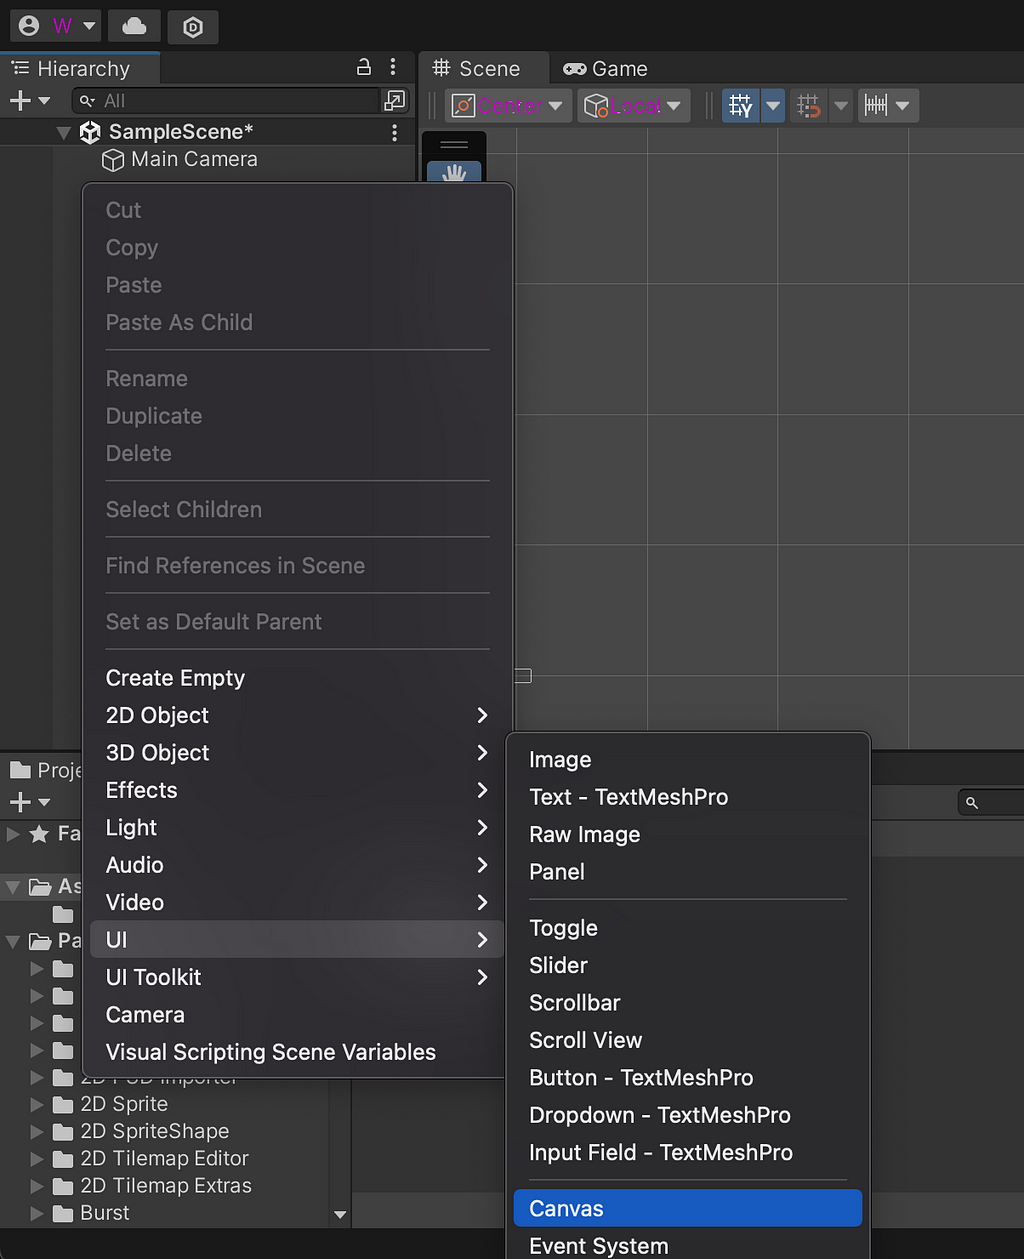
You can choose to give your Canvas a name — I am naming mine “WelcomeCanvas”. Once this is done, we will right click on the Canvas we just created, and go to “UI > Panel”.
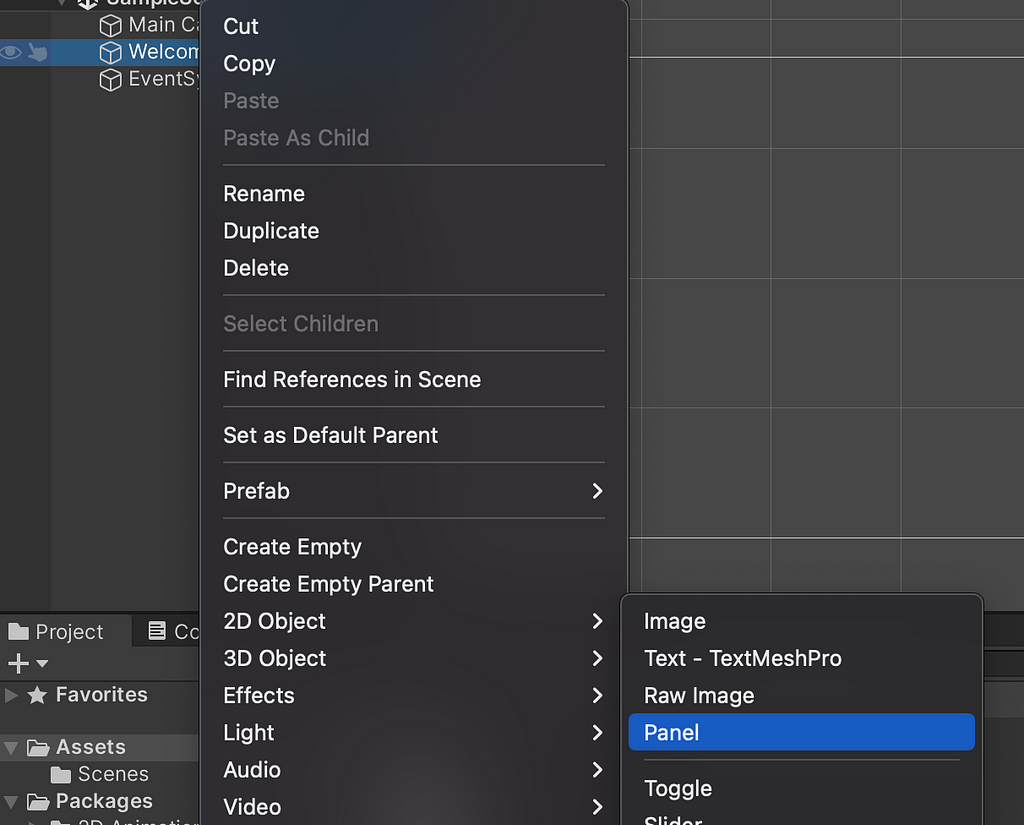
After you’ve added the panel, you can adjust the scale (size) in the Inspector panel on the right, or you can just leave it as is if you want it to just take up the standard amount of space. I personally am also going to change the color of the panel, but I’ll let you play around with the styling on your own — you don’t need to copy every single detail the exact same way I do it.
Adding Text
Next, we are going to add some text to the panel. We can do this by right clicking on the panel in the Hierarchy window, and then selecting UI > Text — TextMeshPro.
You may or may not be presented with a popup modal with a message about needing to install some essentials — if you get that popup, click the button to Import TMP Essentials. Personally, I chose to ignore the 2nd part (Import Extras), but feel free to import those as well if you like.

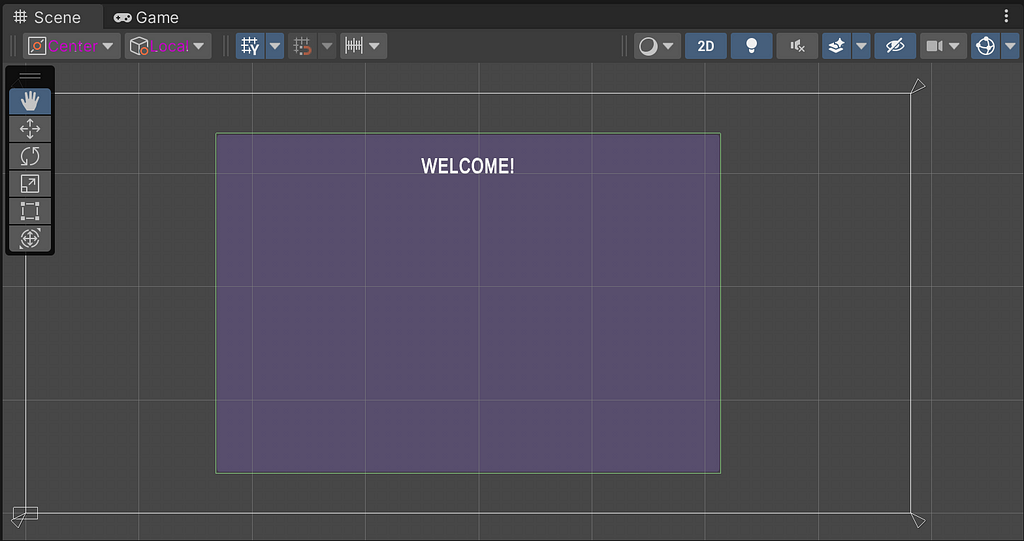
Once you’ve done this, you’ll see the text show up in the Scene window. You can adjust the text itself, along with its properties (size/position etc) in the Inspector panel on the right. I am going to change my text to “WELCOME!”, and align it at the top center of our panel. I’ll also adjust the sizing of the text and make it bold — as I mentioned before, feel free to style things the way you like. My end result looks something like this for now:
Adding Buttons
Next, it’s time to add 2 buttons to our modal — a Settings button, and a Log In button. Similar to the last item we added, we need to right click on our Panel in the Hierarchy window — then click UI, then Button — TextMeshPro.
Once you do that, you’ll see a basic button with some text on it.
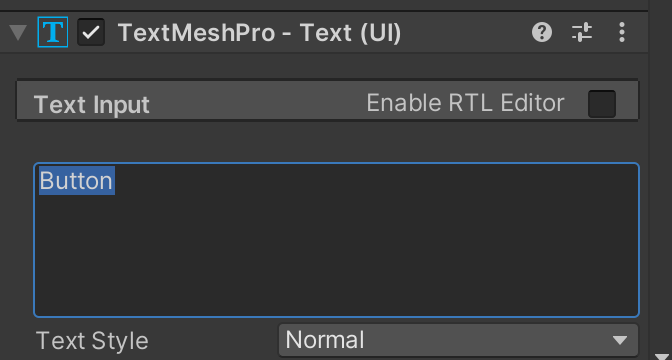
This time, you’ll notice that the Inspector panel doesn’t exactly allow you to edit the text on the button. The reason for that is because the button is the parent component — and in order to edit the text itself, you need to select the child component.
If that sounds confusing, don’t worry. Just take a look at the Hierarchy panel.
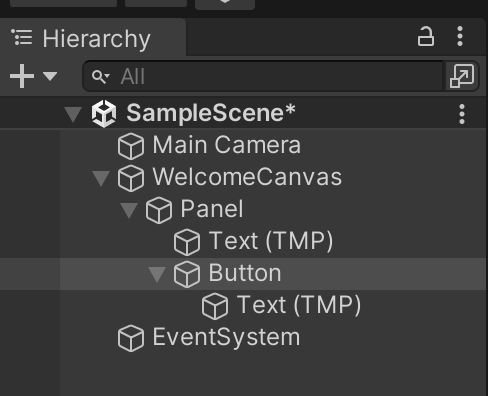
Notice how “Button” is currently highlighted. If you expand the Button element by clicking on the arrow next to it, you will see “Text (TMP)”, which is the child component that contains the actual text. Click on Text (TMP) so it becomes highlighted.
You’ll notice that now, you can go over to the Inspector panel and change the text. I am going to change mine from “Button” to “LOG IN”.
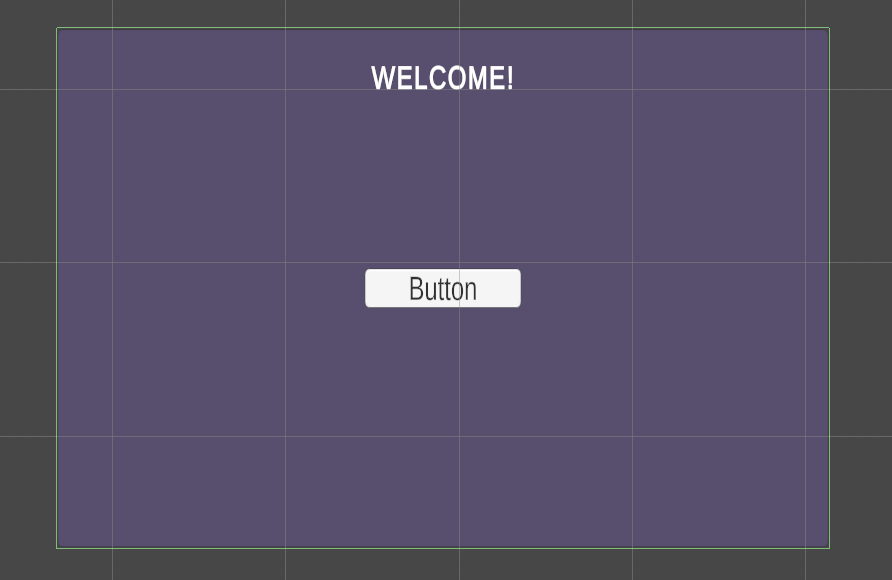
Once I’m done changing the text of the button, now I need to go back to the Hierarchy panel and make sure to select the entire button component again, not just the “Text (TMP)” child. After doing that, I can adjust the properties of the button itself, moving it where I want to etc. My final result looks like this:

Now that this is done, I am going to repeat the process for the Settings button — I don’t think there’s any point in showing you the process again, so just go ahead and add 1 more button for Settings.
Adding Logic
Ok, now that we’ve got a very basic welcome screen set up, it’s time to start adding some logic into the mix. We need to be able to do something when the user clicks the buttons, and we also only want to show this Log In button if the user has not logged in yet. This is where we dive into the concept of scripts.
But before we get too far ahead of ourselves, we need to install some dependencies into our project.
Installing Dependencies
We are going to need to add the following packages to our project:
- NativeWebSocket
- EosSharp
- AnchorLinkSharp
- WcwUnity
- UALUnity
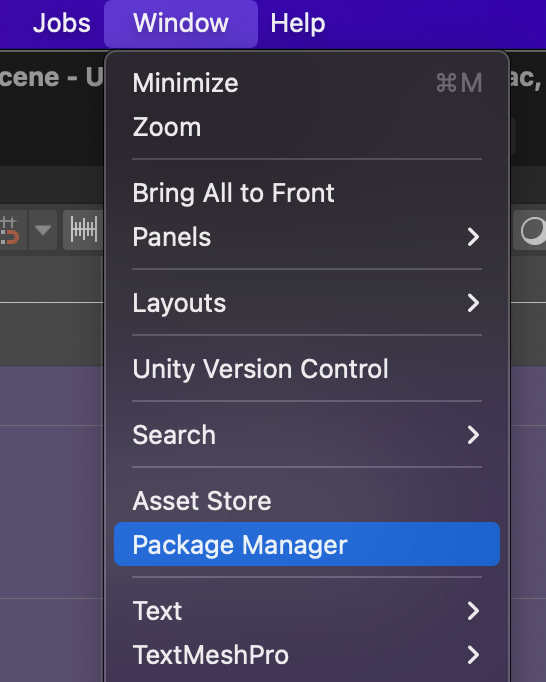
First, go to the “Window” tab at the top of the screen, then click “Package Manager”.
Inside the Package Manager window, you will see a little “+ Icon” that opens up a drop down — click that, and then click “Add package from git URL”.
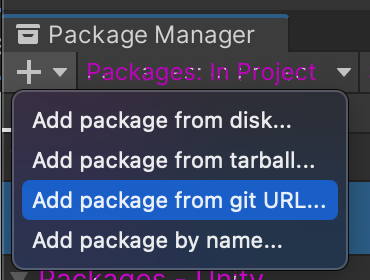
Next, paste the following git URL into the field that pops up:
https://github.com/endel/NativeWebSocket.git#upm
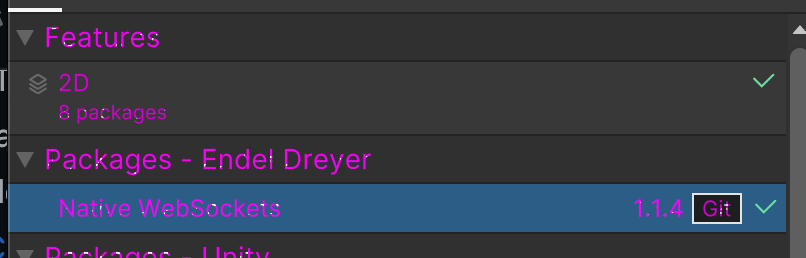
Then click the “Add” button, and the package should be installed. If it works properly, you will see the NativeWebSockets package in your list:
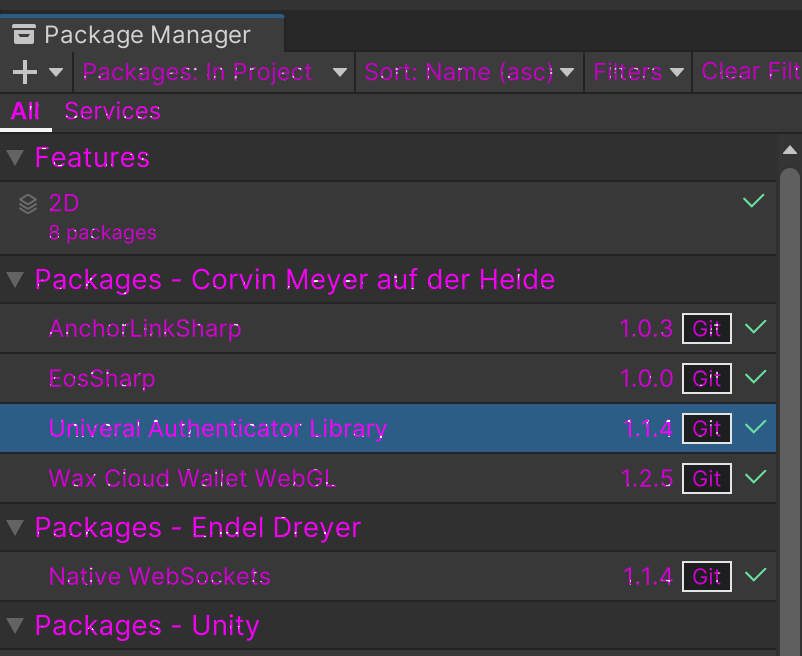
Unfortunately, Unity is a bit annoying with the way you have to do this process — so now you need to repeat this 1 by 1 with the 4 remaining packages:
- https://github.com/liquiidio/EosSharp.git#upm
- https://github.com/liquiidio/AnchorLinkSharp.git#upm
- https://github.com/liquiidio/WcwUnity.git#upm
- https://github.com/liquiidio/UniversalAuthenticatorLibraryUnity.git#upm
Once you are done installing them, you should see all 5 packages in your list.
Setting Up The Login Flow
Ok, now that we have all of the necessary packages installed, we are ready to set up the WAX login process. Some of the wording might be a bit confusing here if you aren’t an expert at Unity yet, but just follow along and you’ll figure things out.
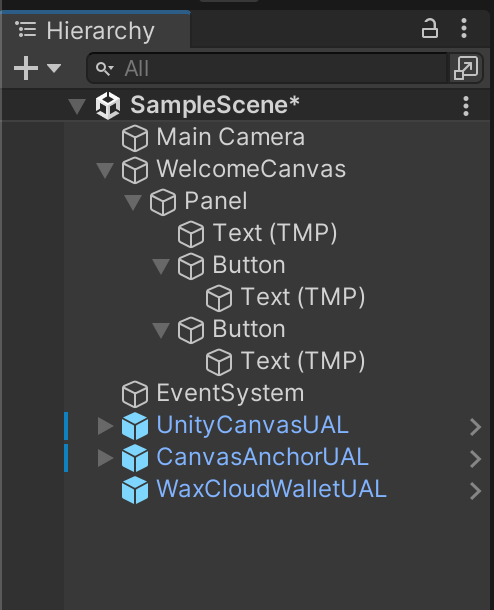
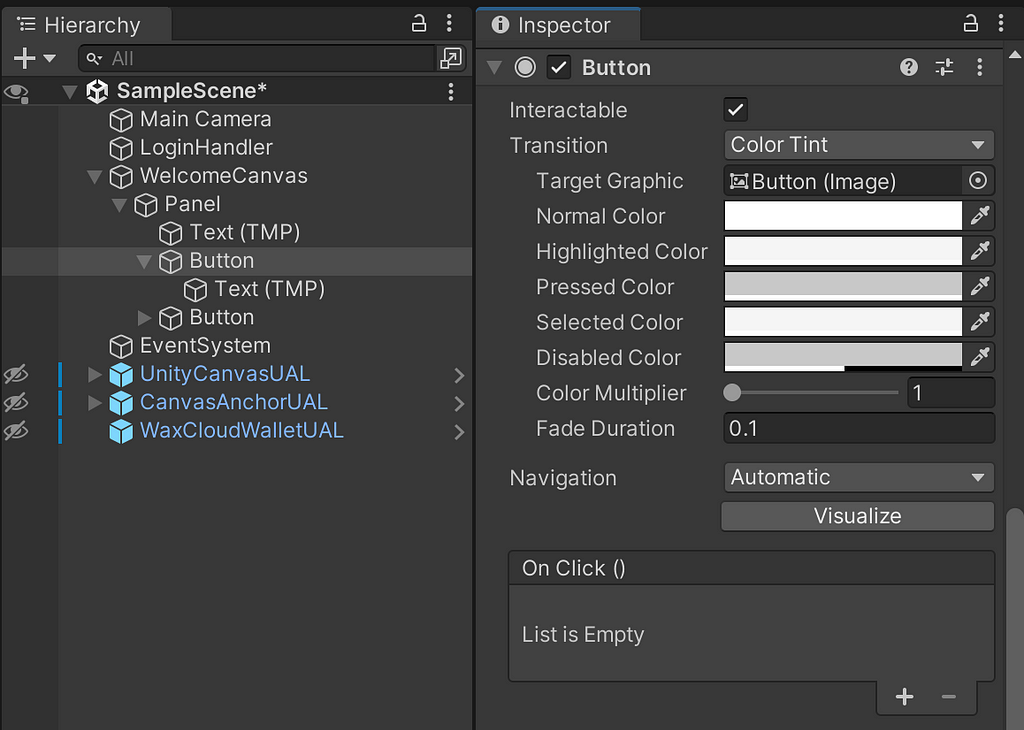
At the bottom left hand side of your Unity screen, you will see a tab called “Project”. Under that tab, there should be a list of folders, files, etc. Navigate to Packages > Universal Authenticator Library > Src > Canvas > Prefabs.
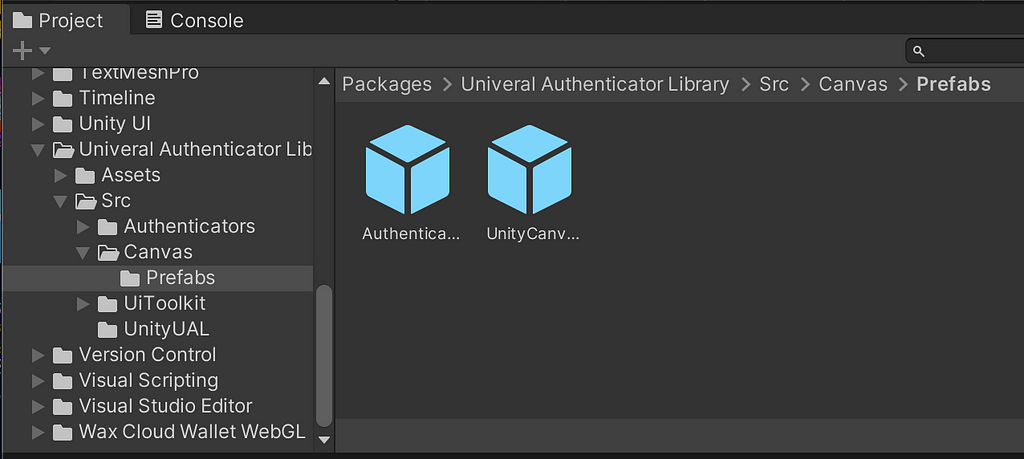
To the right of the folders, you should now see 2 items — AuthenticatorButtonPrefab, and UnityCanvasUAL. What we are going to do, is click on UnityCanvasUAL, and drag it up into the “Hierarchy” panel (the one at the top left where we added our buttons and text before.
Next, we are going to do the exact same thing for 2 more prefabs (prefabs are essentially just reusable templates — they allow you to duplicate an object over and over without needing to create it from scratch every time).
The 2 prefabs that we need to add to our project are located at:
Universal Authenticator Library > Src > Authenticators > Anchor > Prefabs (there are 2 prefabs there, but the one you need is called CanvasAnchorUAL.
Universal Authenticator Library > Src > Authenticators > WaxCloudWallet > Prefabs (there is only 1 prefab in this folder, so pretty self explanatory).
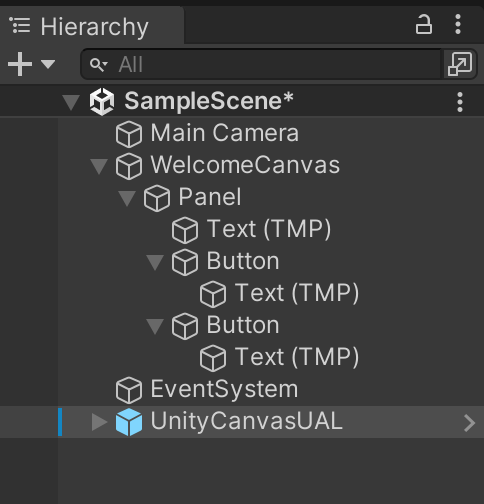
Once you are done adding them, your Hierarchy should look like this:
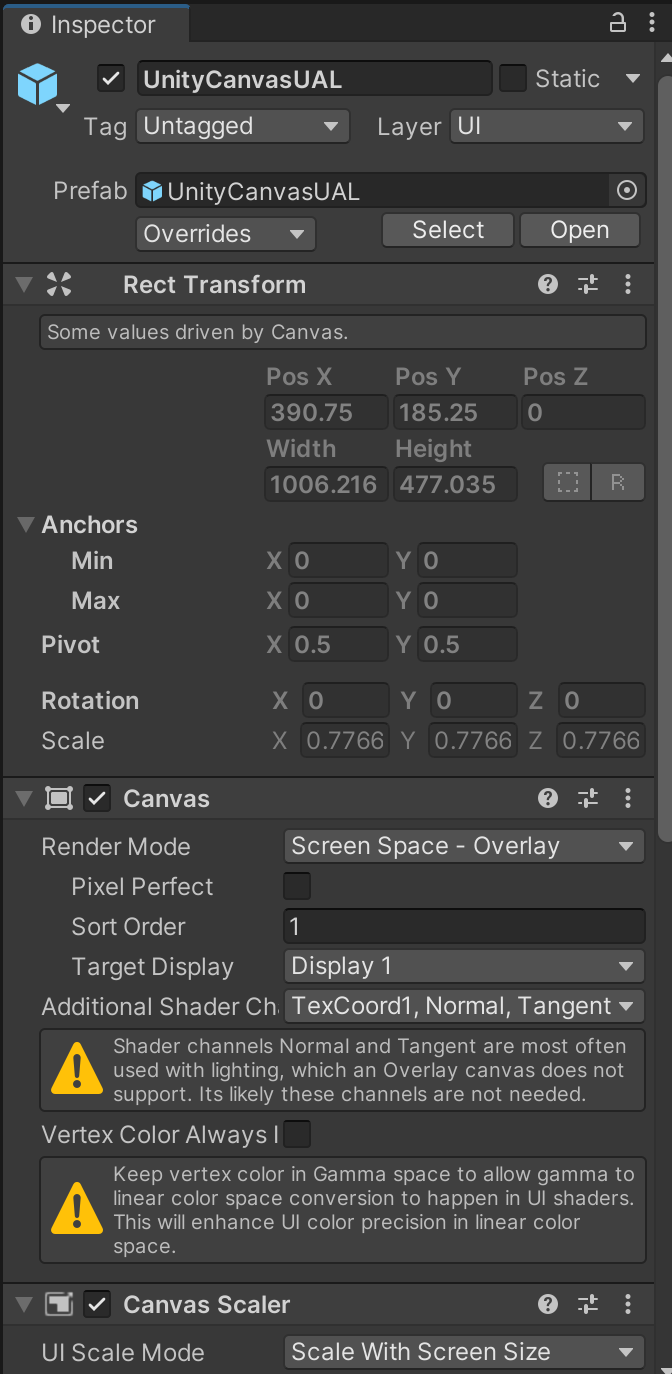
Now, you need to click on UnityCanvasUAL so that it becomes highlighted. Once you do that, you will be able to edit some details over in the Inspector panel on the right.
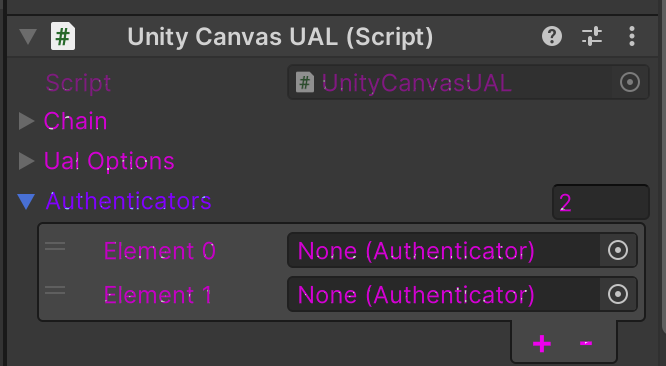
The important part is a bit further down the panel. You need to scroll down until you find the section that says Unity Canvas UAL (Script). In that section, you will see a line of text that says “Authenticators”, with an arrow next to it. Click on Authenticators to expand it, and you should see 2 input fields that say Element 0 and Element 1.
These 2 fields are where you are going to specify the 2 authenticators that we previously dragged into the Hierarchy panel (CanvasAnchorUAL and WaxCloudWalletUAL). This is very simple (and important) — all you need to do is drag CanvasAnchorUAL from the Hierarchy panel onto Element 0, and then drag WaxCloudWalletUAL onto Element 1. The end result should look like this:
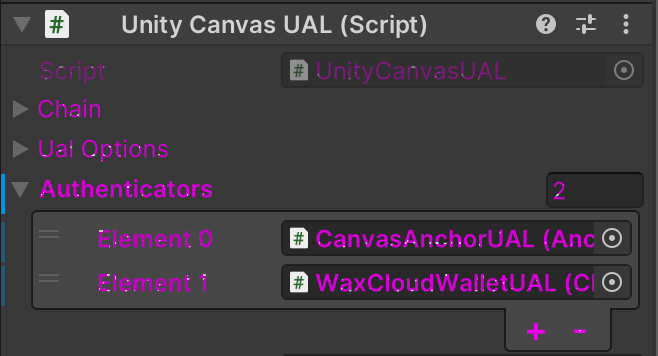
In layman’s terms — what we just did was tell the WAX software which wallets that we want to let people log in with. Now that we have this all referenced, we need to actually create a script to log someone in.
Creating The Login Script
Once again, we will right click on the Hierarchy panel to create a new object. This time, however, we will be selecting “Create Empty” from the drop down.
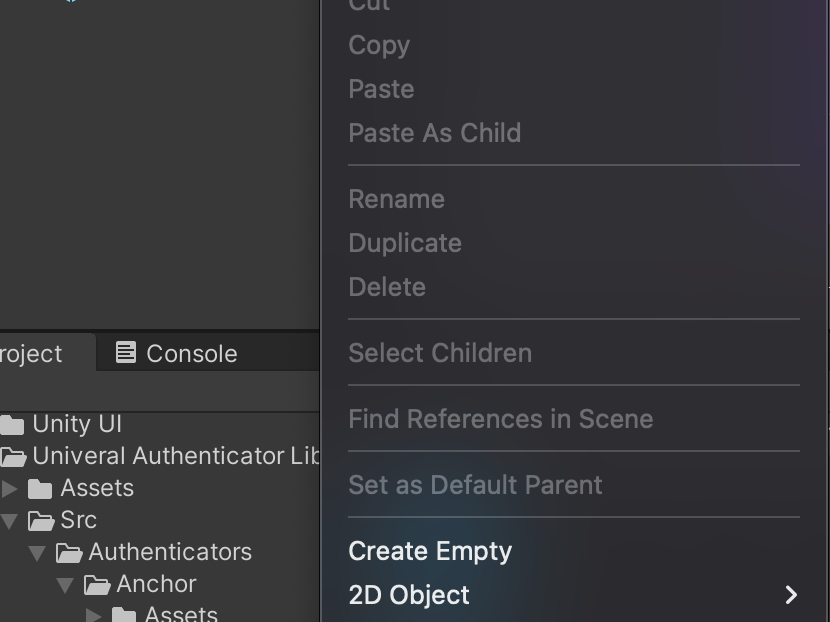
After you click that, you will see a new GameObject show up in the panel. You can also choose a name for the GameObject — I am going to name mine “LoginHandler”. I’ll also drag it toward the top of the menu, but that is just personal preference.

Make sure that your LoginHandler is highlighted as shown in the picture above. This will open up some options in the Inspector panel on the right side. In the Inspector panel, you need to click “Add Component” and then select “New Script” from the drop down.
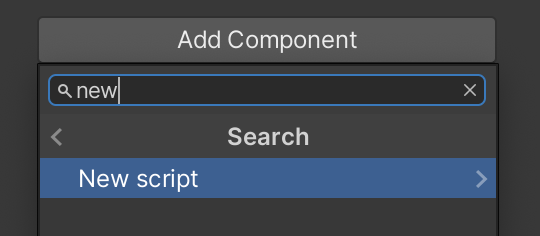
You will also be asked to give the script a name. I named mine HandleLogin. Once you add a name, make sure to click the “Create And Add” button. You should now see your new script in the Inspector panel.
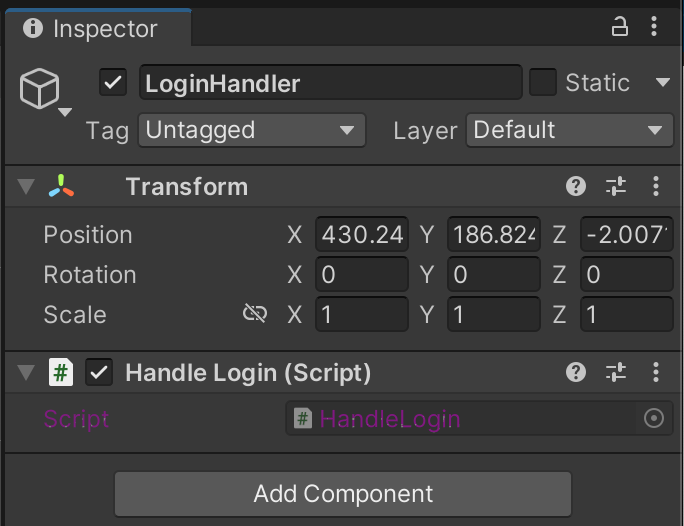
Now, remember earlier during the install process for Unity — we made sure to have a certain module enabled (Visual Studio Code)? We are now going to use that module to edit our script. Right click on the name of the script (The part with the checkmark next to it that says Handle Login (Script)). A drop down menu will appear, and you’ll need to click “Edit Script”.
This will open up the script in Visual Studio Code, with some boilerplate code that looks like this:
using System.Collections;
using System.Collections.Generic;
using UnityEngine;

public class HandleLogin : MonoBehaviour
{
    // Start is called before the first frame update
    void Start()
    {

    }

    // Update is called once per frame
    void Update()
    {

    }
}
At the top of the script, we need to add 2 more using directives:
using UniversalAuthenticatorLibrary;
using UniversalAuthenticatorLibrary.Src.Canvas;
This allows us to access certain items from within the WAX SDK. Without this, we can not log anyone in.
Next, inside of the HandleLogin class, but before the Start() function, we are going to add the following 4 members:
    public UnityCanvasUAL canvasUALHandler;
    private User loggedInUser;
    public bool IsLoggedIn { get; private set; }
    private bool buttonWasClicked = false;
Underneath those 4 members, we will add a function to log the user in, and another function so that we only prompt the user to log in after they have clicked the Log In button.
    public void OnLoginButtonClicked()
    {
        buttonWasClicked = true;
        canvasUALHandler.AuthenticatorPanel.gameObject.SetActive(true);
    }

    private void UserLogin(User user)
    {
        loggedInUser = user;
        Debug.Log($"User {user.GetAccountName().Result} has logged in.");
        IsLoggedIn = true;
    }
In our Start function, we will originally set the AuthenticatorPanel gameObject as inactive (in other words, we won’t show the user the wallet login options until they actually click the Log In button).
    void Start()
    {
        IsLoggedIn = false;
        canvasUALHandler.AuthenticatorPanel.gameObject.SetActive(false);
    }
Finally, we will change the Update function to an async function, and add some logic in there to check if the user clicked the login button, and only proceed with awaiting their login if they have in fact clicked the button.
    async void Update()
    {
        if(!buttonWasClicked){
            return;
        }
        buttonWasClicked = false;
        canvasUALHandler.OnUserLogin += UserLogin;
        await canvasUALHandler.Init();
    }
The end result should look like this:
using System.Collections;
using System.Collections.Generic;
using UnityEngine;
using UniversalAuthenticatorLibrary;
using UniversalAuthenticatorLibrary.Src.Canvas;

public class HandleLogin : MonoBehaviour
{
    public UnityCanvasUAL canvasUALHandler;
    private User loggedInUser;
    public bool IsLoggedIn { get; private set; }
    private bool buttonWasClicked = false;

    public void OnLoginButtonClicked()
    {
        buttonWasClicked = true;
        canvasUALHandler.AuthenticatorPanel.gameObject.SetActive(true);
    }

    private void UserLogin(User user)
    {
        loggedInUser = user;
        Debug.Log($"User {user.GetAccountName().Result} has logged in.");
        IsLoggedIn = true;
    }
    void Start()
    {
        IsLoggedIn = false;
        canvasUALHandler.AuthenticatorPanel.gameObject.SetActive(false);
    }


    async void Update()
    {
        if(!buttonWasClicked){
            return;
        }
        buttonWasClicked = false;
        canvasUALHandler.OnUserLogin += UserLogin;
        await canvasUALHandler.Init();
    }
}
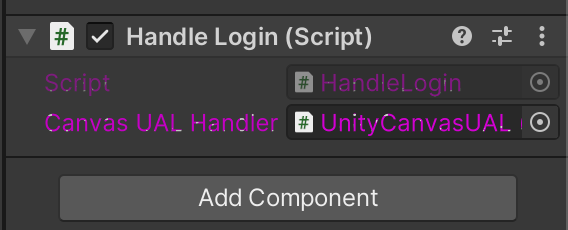
Ok, save the text file and head back into Unity. Make sure the LoginHandler is still highlighted in the Hierarchy panel. You’ll notice that in the Inspector panel, there is now a new option called Canvas UAL Handler. This is because of the public canvasUALHandler member that we created in our script.
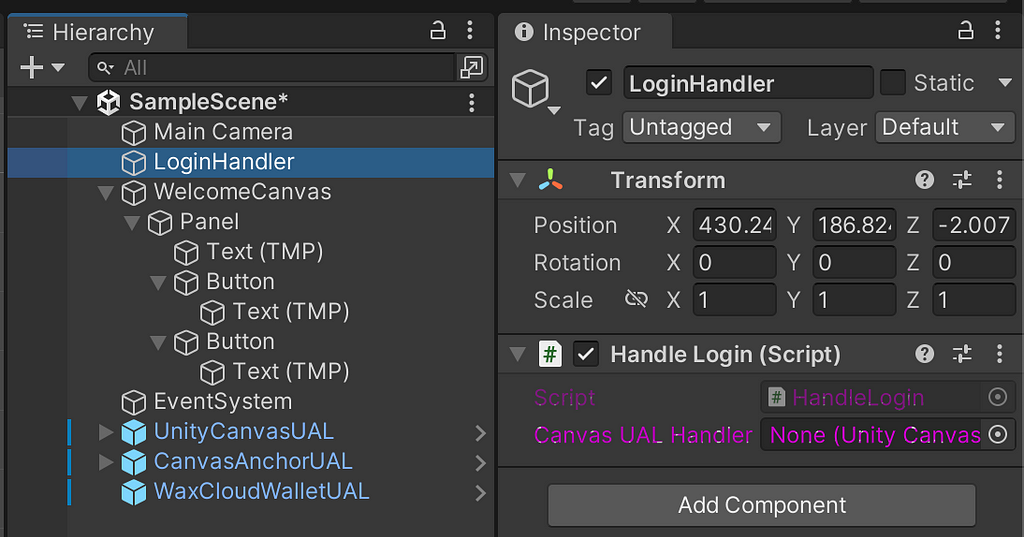
You might also notice that I moved my Hierarchy panel over next to the Inspector panel. This is personal preference, but it makes it easier to move between the Objects and the Inspector more efficiently. I digress… what we need to do now, is drag that UnityCanvasUAL prefab from the Hierarchy panel, and place it directly onto that Canvas UAL Handler input that currently says “None (Unity Canvas …)” on it. If you do this correctly, you should end up with this:
There are just a couple of things left to do, and then we can log the user in. The next step is to navigate to our “LOG IN” button that we created earlier, and select it in the Hierarchy panel.
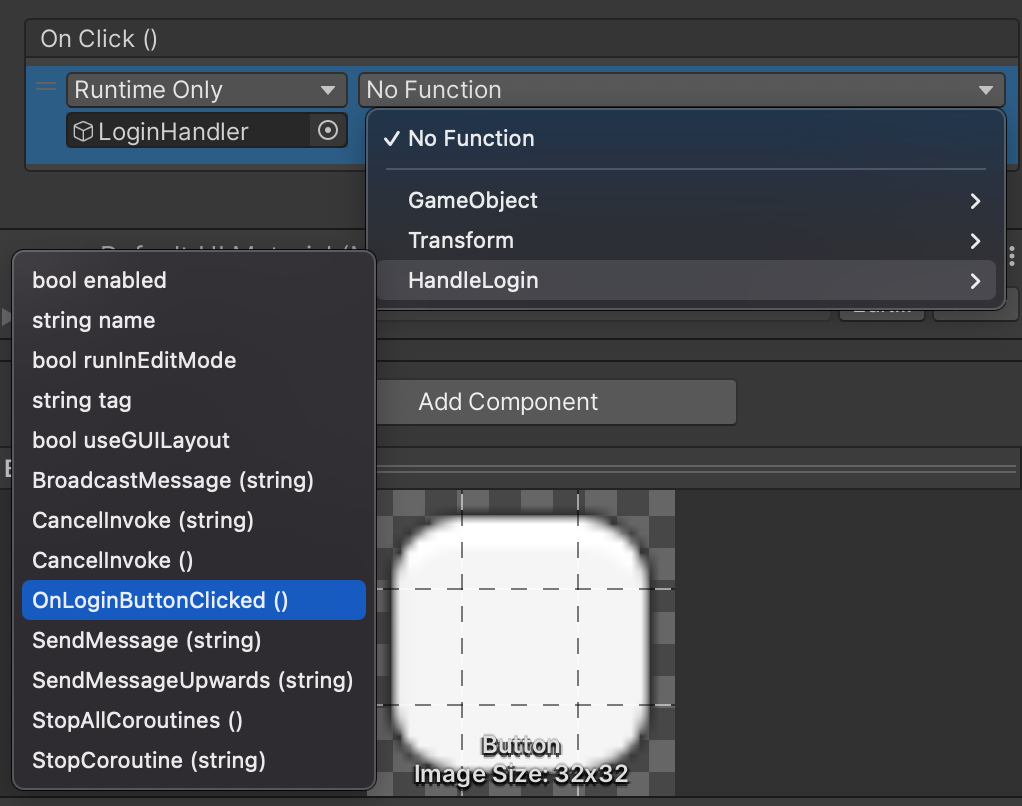
If you do that, and then you scroll down the Inspector panel, you should see an option for On Click events.
Click on the “+” icon to add a new On Click event. Then, drag your LoginHandler gameObject from the Hierarchy panel, directly onto the object field of the new On Click handler. And finally, select the OnLoginButtonClicked function that we previously created.
At this point, we can technically log a user in… but we should do one more thing first — make sure our custom “Log In / Settings” panel is hidden once we open the WAX wallet login modal.
To do this, we are going to create one more script. Click on your WelcomeCanvas in the Hierarchy panel. Scroll down the Inspector panel, click “Add Component”, select “New Script” and name your script WelcomeCanvasManager.
Right click on that script, and open it up in Visual Studio Code.
Inside our new script, all we are going to add is 1 public function:
using System.Collections;
using System.Collections.Generic;
using UnityEngine;

public class WelcomeCanvasManger : MonoBehaviour
{
    public void ToggleWelcomeCanvasVisibility()
    {
        gameObject.SetActive(false);
    }
}
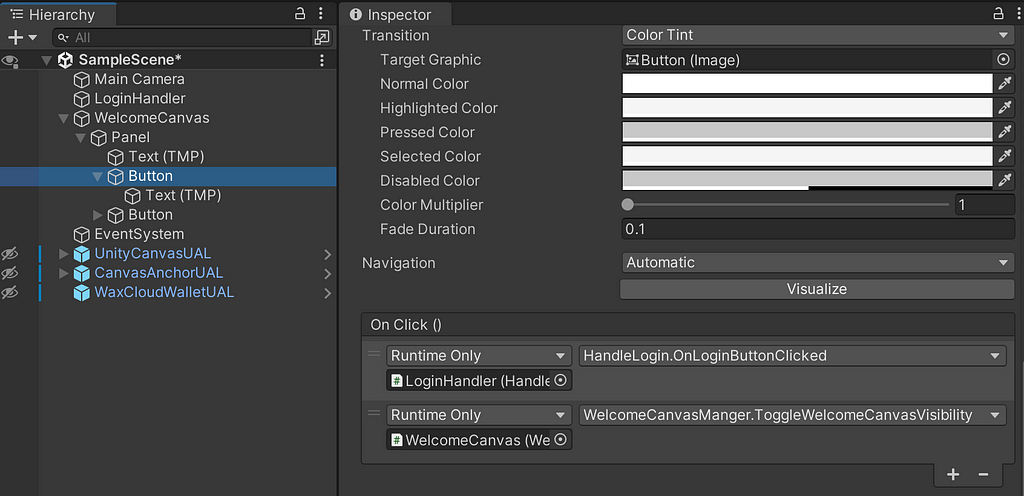
Save your script, and head back to the Hierarchy panel. Select the Button that contains the On Click handler that we added before, and add 1 more On Click event to it. This time, you are going to drag the WelcomeCanvas onto the object field, and select the function that we just defined in our script, like so:
Testing Our Scene!
We our now ready for the moment of truth. If we did everything correctly, then here’s what should happen when we click the play button:
- At first, we only see the panel with the LOG IN and SETTINGS buttons.
- After clicking the LOG IN button, our WelcomeCanvas will disappear, and the WAX wallet login options will be displayed.
- After choosing a WAX wallet, we will be prompted to sign into our account.
- Upon successfully signing in, we should be able to see a message in the Unity console that says User
has logged in.
Let’s give this a test!
https://medium.com/media/810b141718a596eefd5a4236d695f3eb/hrefIt worked! We still have a TON of work to do before this project is completed (or even before this scene is completed). We haven’t even covered how to handle cases where the user fails to log in, or cancels the login process — but this article is about 3,600 words long now — so I think this is it for part 1!
More follow up articles will be released soon, along with a full video series on my YouTube channel, so make sure to follow along and subscribe! If you have any questions/feedback whatsoever, don’t forget to pop into my Telegram or Discord and let me know.
See you next time!
Create A Video Game On WAX Blockchain Using Unity SDK — Your Ultimate Starter Guide, Part 1 was originally published in waxdao on Medium, where people are continuing the conversation by highlighting and responding to this story.